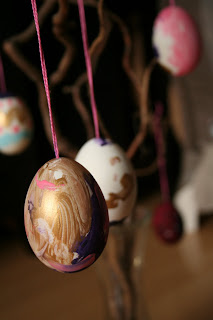
Last week we used eggs from our backyard ducks (well, duck, as we only have 1 female, and therefore only 1 layer) to create some Easter decorations. I wanted to blow out some eggs to make ornaments for Christmas, but never got around to it, so this was my first shot at doing so. I did a little internet research on how to blow out eggs, and then finally just sort of winged it as I went. I am sure there is a better way to do this, but I figured I would use what I had and learn as I went. And they worked. Sort of. I think I still have some kinks to work out, but I am happy with the result for this first go-round.
What I did was to take a duck egg ( I heard that duck eggs actually work better for this because the shells are stronger, but I did not try with any chicken eggs, so I don't have anything to compare to) and with a clean (washed) nail I punctured a small hole in the top of the egg and then made a bigger hole in the bottom of the egg. To make the bottom hole bigger, I just punctured it with the nail and then moved the nail around in a circle until the hole was dime to quarter sized (they got smaller as I got better, actually). This is where I could have used some tips, as the bottom hole was sort of jagged, not dangerously so, but not smooth either.
Anyways, once you have that bottom hole, puncture the yolk inside the egg (I just used the nail to do this as well) and then shake the egg out of the shell. I shook mine into a tupperware so I could eat it the next day for breakfast... This sometimes take a little while, but once it starts coming it looks pretty cool.
Then, once the egg is out, rinse the inside of the shell with warm water. Once you have all of your eggshells, bake for about 10 minutes at 250 F. Supposedly this helps to harden the egg.
Then, when cooled, paint the eggs with acrylic paints. The problem with acrylics is that they are not washable. And non-washable paint and 3-year olds are a tough mix. I make Finn put on old clothes, go to our art table outside, only let him have one paint color at a time, and watch him like a hawk to make sure he doesnt touch anything besides what he is painting. Eggs are actually really difficult to paint because there is not a good spot to hold onto, they are sort of slippery, and if you want to paint the whole thing at once, you end up touching (and smearing) wet paint. Plus, eggs are delicate. This was confirmed by the fact that we had 8 eggs to paint and only 5 made it onto our holiday tree.
We put the eggs in small jars to dry. Once dry, I used a needle to thread embroidery floss from the top of the egg to the inside. Then I used a pen to keep pushing the floss down until it came out the bottom hole, where I could grab it, tie a double knot, and then pull it back up through the top. Now the eggs were ready to (carefully) be hung from our holiday tree.
This project was more of a process than I had anticipated, but it was fun and I think once I get more practice, they will end up looking really nice. I think maybe next time I will dye the eggs and then use a stencil to create a design. Hopefully the Easter Bunny will be proud of our work!
Pin It Now!


These are beautiful! I love the closest one in the top picture. What a great mama for braving the acrylic paints!
ReplyDeleteI love your ornaments! What a fantastic idea that I will have to try to remember next year :).
ReplyDelete